Submodule 5.3: More elements
| Site: | pro.digbi |
| Course: | Web Design [HTML und CSS] |
| Book: | Submodule 5.3: More elements |
| Printed by: | Gast |
| Date: | Wednesday, 22 July 2026, 2:14 AM |
Description
- div element
- float and clear tags
- span element
The div element
The <div> tag is used to group large areas of HTML in order to apply them CSS (or JavaScript as we will see later).
In the web page, white space is displayed before and after the div element.
An appropriate usage of the <div> element would be if we wanted to apply the same style to multiple paragraphs of our HTML. For example, if we wanted 10 of our paragraphs to have the same style, we could group them using the <div> element and apply the necessary class only one time instead of 10.
Examples
The following code:
<!DOCTYPE html>
<html lang="en">
  <head>
    <style>
        .cl1 {background:lightblue}
    </style>
  </head>
  <body>
    <p>This is a paragraph before the div</p>
    <div>
        This is a div with no style
    </div>
    <p>This is a paragraph in the middle</p>
    <div class="cl1">
        <p>This is a p in a div with a blue background</p>
    </div>
  </body>
</html>
will create a page displayed as:
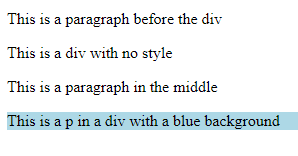
The following code:
<!DOCTYPE html>
<html lang="en">
  <head>
    <style>
        .cl1 {background:yellow; font-size:16pt; font-family:courier}
        .cl2 {background:lightblue; font-size:3em; font-family:Arial; width:30%}
    </style>
  </head>
  <body>
    <p>This is a paragraph before the div</p>
    <div class="cl1">
        This is a div with a yellow background
    </div>
    <p>This is a paragraph in the middle</p>
    <div class="cl2">
        This is a div with a blue background
    </div>
  </body>
</html>
will create a page displayed as:
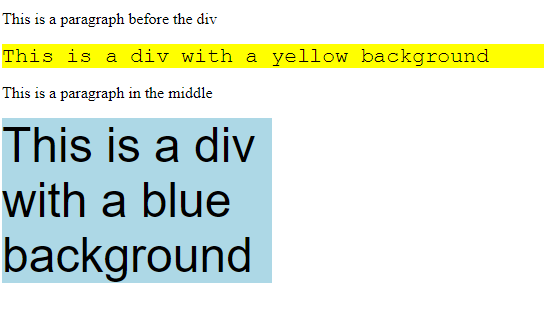
Float and Clear
So, we have our familiar code:
<!DOCTYPE html>
<html lang="en">
  <head>
     <style>
       .cl1 {background:yellow; font-size:1em; font-family:courier; width:20%}
        .cl2 {background:lightblue; font-size:1em; font-family:courier; width:20% }
     </style>
   </head>
   <body>
     <div class="cl1">
        This is a div with a yellow background
     </div>
     <div class="cl2">
        This is a div with a blue background
     </div>
     <ol >
        <li>First item</li>
        <li>Second item</li>
     </ol>
   </body>
</html>
and its output:
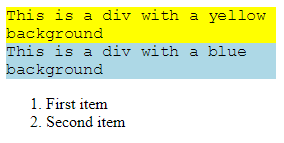
We want to achieve the output shown in the image. We need to move the yellow div totally left and place the blue div next to it.

To achieve this, we will use the float property which specifies how an element should float.
In our code, we create a class and we name it .leftfloat.
.floatLeft{float:left}<div class="cl1 floatLeft"><div class="cl2 floatLeft">
clear". This specifies which elements can float beside the cleared element and on which side..clearLeft .clearLeft{clear: left}<ol class="clearLeft">.floatLeft and .clearLeft classes in our list.<ol class="floatLeft clearLeft"><!DOCTYPE html>
<html lang="en">
<head>
<style>
.floatLeft{float:left}
.clearLeft{clear:left}
.cl1 {background:yellow; font-size:1em; font-family:courier; width:20%}
.cl2 {background:lightblue; font-size:1em; font-family:courier; width:20% }
</style>
</head>
<body>
<div class="cl1 floatLeft">
This is a div with a yellow background
</div>
<div class="cl2 floatLeft">
This is a div with a blue background
</div>
<ol class="floatLeft clearLeft" >
<li>First item</li>
<li>Second item</li>
</ol>
</body>
</html>The span element
The <span> tag is used to group small part of a text.
Similar to <div>, is used to apply CSS or JavaScript rules.
However, in contrast with <div>, the span is an inline element. This means that it doesn’t add a line break. Thus, it can be used inside any element./
Example
The CSS rules:
<!DOCTYPE html>
<html lang="en">
  <head>
    <style>
      #cl1 {background:yellow;}
    </style>
  </head>
  <body>
    <p>This is not span text <span>but this is</span> and this isn't</p>
    <p>This is not span text <span id ="cl1">but this is</span> and this isn't</p>
  </body>
</html>
will create a page displayed as:
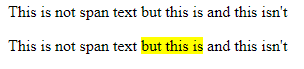
Exercise
For more information about div and span elements: https://www.w3schools.com/html/html_blocks.asp
Exercise
- Open your editor, create a new file and save it as
exersice05.3.01.htmlin the folder "Exercises". - Use code from this book paste it in the new file.
- Modify and save the file. The browser's output should be as shown in the following image:

<!DOCTYPE html>
<html lang="en">
  <head>
    <style>
      .myol { margin:0px; padding-right:10px}
      .floatLeft{float:left}
      .cl1 {background:yellow; font-size:1em; font-family:courier; width:20%}
      .myspan{color:red; font-size:1.2em}
    </style>
  </head>
  <body>
    <ol class="myol floatLeft " > <li>First item</li> <li>Second <span class="myspan">item</span></li> </ol>
    <div class="cl1 floatLeft">This is a div with a yellow background </div>
  </body>
</html>